Tutorial
Introduction to GUI Programming with FLTK [En]
von  Lothar Schirm Lothar Schirm | Seite 1 von 1 |
(Siehe auch: German tutorial / Deutsches Tutorial: Einführung in die GUI-Programierung mit FLTK)
Contents
1. What is FLTK?
2. Download and Installation
3. A First Program
4. Widgets
4.1 Fl_Button
4.2 Fl_Input and Fl_Output
4.3 Fl_Text_Editor and Fl_Text_Display
4.4 Fl_Browser
4.4.1 A Listbox
4.4.2 A Table in a Browser
4.5 Fl_Chart
4.6 Fl_Choice
4.7 Fl_Menu_Bar, flFileChooser, flMessageBox
4.8 Other Standard Dialogs (Common Dialogs)
1.What is FLTK?
FLTK (Fast Light Toolkit) is an easy-to-use C++ GUI library for
Linux and Windows. See website ![]() http://www.fltk.org . There is this
http://www.fltk.org . There is this
also a wrapper for FreeBASIC in the English FB forum. This is the project site:
"FLTK C for FreeBasic" by D.J.Peters
(![]() http://www.freebasic.net/forum/viewtopic.php?f=14&t=24547)
http://www.freebasic.net/forum/viewtopic.php?f=14&t=24547)
On the project site is also a link to download the documentation. The download of the wrapper includes numerous code examples that help very much to become familiar with FLTK.
In addition to graphical user interfaces also graphics can be programmed with
corresponding drawing commands. OpenGL may be used as well. However graphics
programming with FLTK is not the subject of this tutorial. For that purpose, I would
like to refer to the code examples in the wrapper.
There is also a FLTK GUI Designer (FLUID). However, this generates C++ code,
so that it can not be used for FreeBASIC.
2. Download and Installation
See project site.
3. A First Program
We start with a simple program: A window with a text ("Welcome to FLTK!") and a
button. When the button is clicked, a test output: "Button was clicked!" should be
shown on the console window.
The code for this is very simple:
#Include "fltk-c.bi"


'Windows and widgets:

Dim Shared As Fl_Window Ptr Window_Main

Dim Shared As Fl_Box Ptr Box_text

Dim Shared As Fl_Button Ptr Button_Click


Sub Create_Window_Main ()

'Window with button:


    Window_Main = Fl_WindowNew (300, 200, "Button Test")

    Box_text = Fl_BoxNew(100, 80, 100, 20, "Welcome to FLTK!")

    Button_Click = Fl_ButtonNew (100, 160, 100, 20, "Click me!")


End Sub


Sub Button_Click_Event Cdecl (widget As FL_Widget Ptr)

'Callback function for the Button


  Print "Button was clicked!"


End Sub


'Main program:

Create_Window_Main ()

Fl_WidgetSetCallback0(Button_Click, @Button_Click_Event())

Fl_WindowShow(Window_Main)

Fl_Run


End
Here's a screenshot:
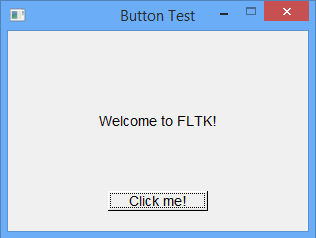
Now let's have a look on the code: What does all this mean?
In the first row we include the header file fltk-c.bi.
Next we define the window with its elements (boxes, buttons, moreover text input
boxes, etc.). All these elements are called widgets in FLTK. All windows and
widgets are passed as pointers, and strings are passed as ZString pointers, see
examples beginning from chapter 4.2.
I like to write the definition of each window into an own Sub, although this
is not absolutely necessary. In the small example programs of the wrapper, this
is generally not the case. But in my opinion it increases the clarity of the code,
especially for larger projects with several windows. You can then also easily
find all your window definitions with the Function Browser of your IDE.
In the code we have used the widget Fl_Box for the text. This is simply
a rectangular area with a text.
We call the window "Window_Main", the box "Box_text" and the button "Button_Click".
These are declared with "Dim Shared" as global variables of type
FL_Window Ptr, Fl_Box Ptr and Fl_Button Ptr, so that we have
access to these widgets in the callback functions (see below). Examples of callback
functions follow in this tutorial.
The window definition for our window "Window_Main" takes place in a Sub which we
call "Create_Window_Main". Within the sub we need three functions:
Function Fl_WindowNew (w as integer, h as integer, title as const zstring ptr = 0) as Fl_Window ptr

Function Fl_BoxNew (x as integer, y as integer, w as integer, h as integer, label as const zstring ptr = 0) as Fl_Box ptr

Function Fl_ButtonNew (x as integer, y as integer, w as integer, h as integer, label as const zstring ptr = 0) as Fl_Button ptr
The parameter passing, as in the functions "Fl_BoxNew" or "Fl_ButtonNew", is
always the same for all widgets:
Name of the widget
x, y = position of the upper left corner of the widget (pixel coordinates)
w = width of the widget in pixels
h = height of the widget in pixels
label = label.
Examples of other widgets follow in the chapters below.
The Sub "Create_Window_Main" is followed by our callback function for the
Button_Click. We call it "Button_Click_Event". It is important to use Cdecl
and the parameter of type Fl_Widget Ptr. In the callback function, we
write what our program shall do when the Button_Click is pressed.
The main program is very short. First, our Sub "Create_Window_Main" is called.
Then, with Fl_WidgetSetCallback0 the button "Button_Click" is linked with
the callback function. With Fl_WindowShow we put our window on the screen.
(Fl_WindowHide removes a window from the screen, this is especially useful
for projects withmultiple windows.) With Fl_Run the program runs until
the window is closed via the close button in the title bar or via the context menu
of the window in the title bar.
Fl_WidgetSetCallback0 looks a little bit strange because of "0" at the end,
but this is not a misprint. There are different types of callbacks in FLTK.
You can use Fl_WidgetSetCallbackArg, Fl_WidgetSetCallback1Arg
or Fl_WidgetSetCallback in order to pass parameters to the the callback
function in different ways. Examples of this can be found in the download of the
wrapper as well as in this tutorial.
The above program must, of course, be compiled as a console application because
of the "Print" statement in the callback function. This also applies to the
following examples so far as they include the "Print" statement.
In addition to the FLTK GUI we can also use "ScreenRes" in order to open a normal
graphics window and create our graphics with the normal FreeBasic commands.
That's the nice thing about GUI libraries like FLTK, GTK+ or WX-C: We can still
use the console window (preferably for test issues / debugging) and the graphics
window in the usual way, but additionally get a GUI for free.
4. Widgets
FLTK provides different classes of widgets.
The class Fl_Button supports different types of buttons, for example, normal
Buttons (see above), toggle buttons, check buttons, radio buttons, among others.
The widgets Fl_Input, Fl_Output, Fl_Text_Editor,
Fl_Text_Display and Fl_Help_View provide simple to complex text
input and output facilities
The class Fl_Valuator includes, for example, scrollbars (Fl_Scrollbar)
and sliders (Fl_Slider).
The class Fl_Menu_ allows the creation of menus (Fl_Menu_Bar) and
includes combo boxes (Fl_Choice).
The class Fl_Browser_ allows the representation of lists and tables, and
creating listboxes with single or multiple selection.
User interfaces can, be organized, for example, by scrollaereas (Fl_Scroll),
tabs(Fl_Tabs) or tiles (Fl_Tile).
FLTK also provides standard dialogs (common dialogs), e.g. message boxes,
input boxes, file selection and color selection.
It is not possible to explain all widgets in this tutorial. The most important
ones and their use are explained in the following with a few small examples. For
further details the code examples in the download as well as the documentation
and the header file fltk-c.bi can be studied.
4.1 Fl_Button
The class Fl_Button includes the following widgets:
Fl_Light_Button: activates a "light" (small square to the left in the button
when it is clicked. The Fl_Check_Button is a subclass of Fl_Light_Button.
Fl_Radio_Button: radio button (option button)
Fl_Repeat_Button: creates consecutive callbacks as long as it is pressed
Fl_Return_Button: responds to a mouse click or the Return key (Enter key)
Fl_Toggle_Button: togglebutton
Example of a simple button: see above.
Here is an example for Fl_Toggle_Button, Fl_Radio_Round_Button and
Fl_Check_Button (a Fl_Radio_Round_Button has left a circle with a
mark indicating the "active" state of the button, while the simple
Fl_Radio_Button only works like a togglebutton):
#Include "fltk-c.bi"


'Widgets

Dim Shared As Fl_Window Ptr Window_Main

Dim Shared As Fl_Toggle_Button Ptr Button_toggle

Dim Shared As Fl_Group Ptr Group_radio

Dim Shared As Fl_Radio_Round_Button Ptr Button_radio_red, Button_radio_yellow, Button_radio_green

Dim Shared As Fl_Check_Button Ptr Button_check

Dim Shared As Fl_Button Ptr Button_close


Sub Create_Window_Main ()

'Main window with buttons


    Window_Main = Fl_WindowNew (200, 250, "Test Buttons")

    Button_toggle = Fl_Toggle_ButtonNew (20, 20, 100, 20, "Togglebutton")


    Group_radio = Fl_GroupNew (10, 70, 120, 90, "Choose a color")

        Fl_GroupBegin (Group_radio)

        Button_radio_red = Fl_Radio_Round_ButtonNew (20, 80, 100, 20, "red")

        Button_radio_yellow = Fl_Radio_Round_ButtonNew (20, 110, 100, 20, "yellow")

        Button_radio_green = Fl_Radio_Round_ButtonNew (20, 140, 100, 20, "green")

    Fl_GroupEnd (Group_radio)


    Button_check = Fl_Check_ButtonNew (20, 170, 100, 20, "Checkbutton")

    Button_close = Fl_ButtonNew (20, 200, 100, 20, "Close")


End Sub


Sub Buttons_Event Cdecl (widget As Fl_Widget Ptr, arg As Any Ptr)

'Callback function for all buttons


    Select Case arg

        Case Button_toggle

            Print Fl_ButtonGetValue (Button_toggle)

        Case Button_radio_red

            Print "red"

        Case Button_radio_yellow

            Print "yellow"

        Case Button_radio_green

            Print "green"

        Case Button_check

            Print Fl_ButtonGetValue (Button_check)

        Case Button_close

            End

    End Select


End Sub


'Main:


Create_Window_Main ()


Fl_WidgetSetCallbackArg (Button_toggle, @Buttons_event(), Button_toggle)

Fl_WidgetSetCallbackArg (Button_radio_red, @Buttons_event(), Button_radio_red)

Fl_WidgetSetCallbackArg (Button_radio_yellow, @Buttons_event(), Button_radio_yellow)

Fl_WidgetSetCallbackArg (Button_radio_green, @Buttons_event(), Button_radio_green)

Fl_WidgetSetCallbackArg (Button_check, @Buttons_event(), Button_check)

Fl_WidgetSetCallbackArg (Button_close, @Buttons_event(), Button_close)


Fl_WindowShow (Window_Main)

Fl_Run


End
Here is the screenshot of the current program:
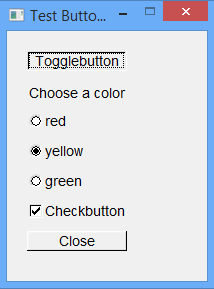
So we have a togglebutton, three radio buttons, a check button and a button to
close the window and quit the program. We must join together the three radio
buttons in a group, because it should be a choice here "one of three". This is
done with the help of a widget Fl_Group and the commands
Fl_GroupBegin and Fl_GroupEnd.
Now we could write for each button its own callback function like in chapter 3.
But we want to simplify our code and just write a callback function for all six
buttons. This can be done using Fl_WidgetSetCallbackArg instead of
Fl_WidgetSetCallback0, because here we can also pass a pointer to the
callback function, e.g. a pointer to the widget in question. Then we can write in
the callback function for each widget in question what sall happen. The status of
a button (1 or 0) can be requested by using Fl_ButtonGetValue (see the
example in togglebutton or check button). In the example it is done diferently
for the radio buttons, but even there we could use Fl_ButtonGetValue. For a
normal button (Fl_Button) this makes little sense, of course.
4.2 Fl_Input and Fl_Output
The widget Fl_Input is a text box of a single line with a prompt, similiar
to the command "Input" in FreeBASIC. The widget Fl_Output looks exactly
the same, but can only display text. There are also input and output boxes for
multi-line texts (Fl_Multiline_Input and Fl_Multiline_Output).
For example: A program with an Fl_Input and Fl_Output as well as a
button. By pressing the button the text from the Fl_Input should be copied
to the Fl_Output.
#Include "fltk-c.bi"


'Window and widgets:

Dim Shared As Fl_Window Ptr Window_Main

Dim Shared As Fl_Input Ptr Input_text

Dim Shared As Fl_Output Ptr Output_text

Dim Shared As Fl_Button Ptr Button_Copy


Sub Create_Window_Main ()

'Window with widgets:


    Window_Main = Fl_WindowNew (300, 200, "Input Test")

    Input_text = Fl_InputNew (100, 50, 180, 20, "Text Input")

    Output_text = Fl_OutputNew (100, 80, 180, 20, "Text Output")

    Button_Copy = Fl_ButtonNew (100, 150, 100, 20, "Copy")

    Fl_Input_SetValue (Input_text, "Edit me!")


End Sub


Sub Button_Copy_Event Cdecl (widget As FL_Widget Ptr)

'Callback function for Button


  Dim text As String


  text = *Fl_Input_GetValue (Input_text)

  Fl_Input_SetValue (Output_text, text)


End Sub


'Main program:

Create_Window_Main ()

Fl_WidgetSetCallback0 (Button_Copy, @Button_Copy_Event())

Fl_WindowShow (Window_Main)

Fl_Run


End
If we run the program, we get the following picture:
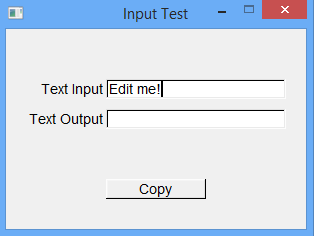
We can edit the text "Edit me!" and copy the text into the text output box by
pressing the button "Copy".
Now let us look at the code. This is an extension of the introductory example. The
"Button_Click" was renamed in "Button_Copy". In the declaration of widgets and in
the Sub "Create_Window_Main" the new widgets have been added in addition with the
names "Input_text" and "Output_text". The syntax is pretty self-explanatory. With
Fl_Input_SetValue the text input box was initialized with an editable
text.
We now look at the callback function. With "text = *Fl_Input_GetValue (input_text)"
the text in the box "Input_text" is read. Note the asterisk! The function
Fl_Input_GetValue only provides a pointer to a Zstring. The asterisk before
this function dereferences this pointer, i.e. delivers the text, see FB manual
![]() http://www.freebasic.net/wiki/wikka.php?wakka=KeyPgOpValueOf). With
http://www.freebasic.net/wiki/wikka.php?wakka=KeyPgOpValueOf). With
Fl_Input_SetValue the text is written into the output box, although it is
a Fl_Output widget. A command "Fl_Output_SetValue" does not exist, because
Fl_Input is placed in the class hierarchy of the widgets above Fl_Output.
The class Fl_Input contains the following widgets:
Fl_File_Input: shows a path name in a text entry field
Fl_Float_Input: allows only the input of floating-point numbers
Fl_Int_Input: allows only the input of decimal digits
Fl_Secret_Input: a hidden password can be entered, only placeholders appear
Fl_Output: see above
4.3 Fl_Text_Editor and Fl_Text_Display
The widget Fl_Text_Editor is a widget for entering text, the text
can be scrolled vertically and horizontally with scroll bar if the
text representation is larger than the text input box.
Again, a code example:
#Include "fltk-c.bi"


'Windows and widgets:

Dim Shared As Fl_Window Ptr Window_Main

Dim Shared As Fl_Text_Editor Ptr Editor_text

Dim Shared As Fl_Text_Buffer Ptr Buffer_text

Dim Shared As Fl_Button Ptr Button_Copy


Sub Create_Window_Main ()

'Window with widgets:


    Window_Main = Fl_WindowNew (300, 300, "Editor-Test")

    Editor_text = Fl_Text_EditorNew (10, 10, 280, 200)

    Button_Copy = Fl_ButtonNew (100, 230, 100, 20, "Copy")


    'Text editor with an editable text:

    Buffer_text = Fl_Text_BufferNew ()

    Fl_Text_DisplaySetBuffer (Editor_text, Buffer_text)

    Fl_Text_BufferSetText (Buffer_text, "Always look at the right side of life! Be happy, don't worry!")


End Sub


Sub Button_Copy_Event Cdecl (widget As FL_Widget Ptr)

'Callback function for button


  Dim text As String


  text = *Fl_Text_BufferGetText (Buffer_text)

  Print text


End Sub


'Main:

Create_Window_Main ()

Fl_WidgetSetCallback0 (Button_Copy, @Button_Copy_Event)

Fl_WindowShow (Window_Main)

Fl_Run


End
Running the program, we get the following window:
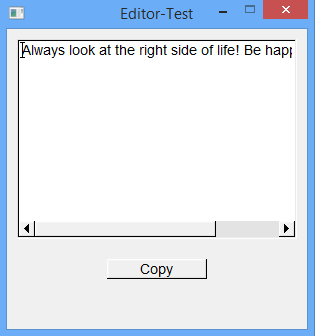
The preset text can be edited. If you click the button "Copy", the text is copied
and displayed on the console window.
In the code appears as a new widget, the text editor with the editable text
"Always look at the right side of life! Be happy, don't worry!". Unfortunately,
it is not possible to write text directly into the Fl_Text_Editor, only via
a text buffer Fl_Text_Buffer. The text buffer buffer must be created and assigned to
the text editor. This is done using the functions Fl_Text_BufferNew and
Fl_Text_DisplaySetBuffer ("Fl_Text_EditorSetBuffer" does not exist because
of the class hierarchy of widgets, see above). Then it is possible to write text
into the text buffer by using Fl_Text_BufferSetText or read text by using
Fl_Text_BufferGetText (asterisk: dereferencing a pointer, see above).
If you want to display only text without having to be changed, the widget
Fl_Text_Display can be used. The syntax for declaration of this widget
(Fl_Text_DisplayNew instead of Fl_Text_EditorNew), creating the
text buffer and writing as well as reading the text buffer corresponds entirely
to the Fl_Text_Editor.
If you want to write text with line feeds into a text buffer, insert Chr(10) at
the end of each line:
Fl_Text_BufferSetText (Buffer_text, "Early to bed and early to rise + Chr(10) + _

makes a man healthy and wealthy and wise."
4.4 Fl_Browser
A Fl_Browser displays a list of strings that can be scrolled. The class
Fl_Browser includes these widgets:
Fl_File_Browser: displays a list of file names, with optional icons
Fl_Hold_Browser: a listbox from which an entry can be selected,
the selection is marked with a blue bar when the mouse is released
Fl_Multi_Browser: a listbox with multiple selection
Fl_Select_Browser: a listbox from which an entry can be selected,
the selection does not remain highlighted when the mouse is released
4.4.1 A Listbox
Example of a list box with a Hold_Browser:
#Include "fltk-c.bi"


'Windows and widgets:

Dim Shared As Fl_Window Ptr Window_Main

Dim Shared As Fl_Hold_Browser Ptr Browser_Selection


Sub Create_Window_Main ()

'Window with widgets:


    Dim i As Integer


    Window_Main = Fl_WindowNew (200, 200, "Hold_Browser")

    Browser_Selection = Fl_Hold_BrowserNew (10, 10, 180, 160, "Selection")

    For i = 1 To 20

        Fl_BrowserAdd (Browser_Selection, "Entry number " + Str (i))

    Next


End Sub


Sub Browser_Selection_Event Cdecl (widget As FL_Widget Ptr)

'Callback function for the browser


    Dim i As Integer

    Dim text As String


    i = Fl_BrowserGetValue (Browser_Selection)

    text = *Fl_BrowserGetText (Browser_Selection, i)

    Print i

    Print text


End Sub


'Main:

Create_Window_Main ()

Fl_WidgetSetCallback0 (Browser_Selection, @Browser_Selection_Event)

Fl_WindowShow (Window_Main)

Fl_Run


End
Here the corresponding screenshot with test output to the console window:
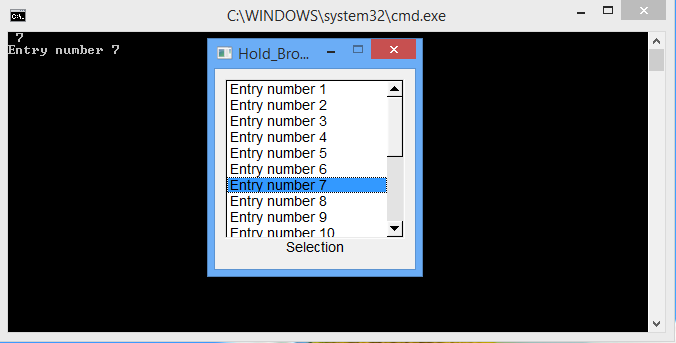
As you can see in the code, the entries are added into the browser row by row
using Fl_BrowerAdd. If we want to write new data into the browser, we can
delete the content by Fl_BrowerClear. Example:
Fl_BrowserClear (Browser_Selection)
We can request the number of the entry selected with the mouse by using
Fl_BrowserGetValue, and the accompanying text by using Fl_BrowserGetText
(see callback function in the code).
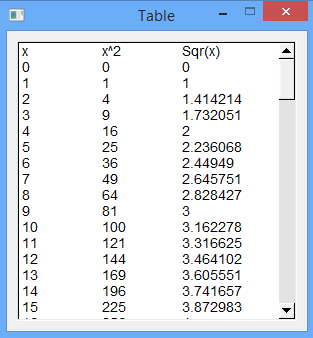
4.4.2 A Table in a Browser
We can use a browser to create any list, and also to create tables. If we want
to write a table into the browser, we must previously set the number of columns
and their widths (in pixels). This is done by using Fl_BrowserSetColumnWidths.
This Sub this is defined as follows:
Sub Fl_BrowserSetColumnWidths (br Fl_Browser As Ptr, arr As Integer Const Ptr)
br is the pointer to the browser. arr is a pointer to an array whose
elements specify the column widths. The array must be null-terminated, that is,
the last element must be 0! In addition, it must be of type "Integer Const", so
it must be declared globally.
The entries in the browser are done as above with Fl_BrowerAdd, where the
columns are separated by Chr(9). We can use Fl_BrowserSetColumnChar in order
to define other delimiters:
Sub Fl_BrowserSetColumnChar (br Fl_Browser as ptr, c as ubyte)
For c we need to use the ASCII code of the desired character, e.g. Asc(";") or
Asc(","). By this way we can, for example, easily represent data from a CSV file created by Excel.
Here is a code example with a function table:
#Include "fltk-c.bi"


Dim Shared As Fl_Window Ptr Window_Main

Dim Shared As Fl_Browser Ptr Browser_Table

Dim Shared As Integer col (3) = {80, 80, 80, 0}

Dim x As Single


Sub CreateWindow_Main

'Window with widgets:


    Window_Main = Fl_WindowNew (300, 300, "Table")

    Browser_Table = Fl_BrowserNew (10, 10, 280, 280)

    Fl_BrowserSetColumnWidths (Browser_Table, @col (0))


End Sub


'Main:


CreateWindow_Main ()

Fl_WindowShow (Window_Main)


'Function table for x ^ 2 and Sqr(x):

Fl_BrowserAdd (Browser_Table, "x" + Chr (9) + "x^2" + Chr (9) + "Sqr(x)")

For x = 0 To 100

    Fl_BrowserAdd (Browser_Table, Str(x) + Chr(9) + Str(x^2) + Chr(9) + Str(Sqr(x)))

Next


Fl_Run


End
Here is the screenshot:
4.5 Fl_Chart
Since we're on the function tables: One can also draw function curves or other
simple diagrams using Fl_Chart.
For example, a sine curve:
#Include "fltk-c.bi"


Dim Shared As Fl_Window Ptr Window_Main

Dim Shared As Fl_Chart Ptr Chart_Sine


Dim i As Integer

Dim As Single x, dx

Const Pi = 4 * Atn (1)


Sub CreateWindow_Main ()

'Window with diagram


    Window_Main = Fl_WindowNew (400, 240, "Chart")

    Chart_Sine = Fl_ChartNew (10, 10, 380, 200, "Time = 0 to 4 pi")

    Fl_WidgetSetType (Chart_Sine, FL_CHART_LINE)


End Sub


'Main:


CreateWindow_Main ()

Fl_WindowShow (Window_Main)


'Draw sine curve:

dx = 4 * pi / 100

For i = 0 To 100

    x = i * dx

    Fl_ChartAdd (Chart_Sine, Sin(x), "", FL_RED)

Next


Fl_Run


End
Screenshot:
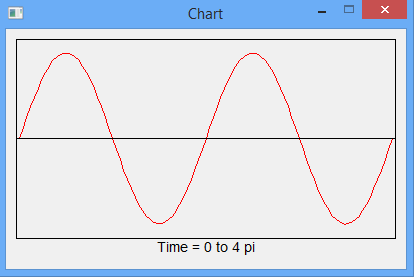
We call our widget "Chart_Sine" (see code). With Fl_WidgetSetType we can
define the type of chart, such as:
FL_CHART_BAR: bar chart
FL_CHART_LINE: line chart
FL_CHART_PIE: pie chart
With Fl_ChartAdd the displayed values are entered one after another. The
second parameter is the numerical value to be entered, the third one is an
associated label (optional) and the last value is the color. The color constants
FL_RED, FL_GREEN, FL_BLUE etc. are declared in the header file fltk-c.bi.
4.6 Fl_Choice
The widget Fl_Choice is a combobox. Here is an example:
#Include "fltk-c.bi"


Dim Shared As Fl_Window Ptr Window_Main

Dim Shared As Fl_Choice Ptr Choice_List


Sub Create_Window_Main ()

'Main window


    Dim i As Integer


    Window_Main = Fl_WindowNew (200, 240, "Combobox")

    Choice_List = Fl_ChoiceNew (60, 20, 120, 20, "Selection")

    For i = 0 To 10

        Fl_Menu_Add (Choice_List, "Coice number " + Str(i))

    Next

    Fl_ChoiceSetValue (Choice_List, 0)


End Sub


Sub Choice_List_Event Cdecl (widget As Fl_Widget Ptr)

'Callback function


    Print Fl_ChoiceGetValue (Choice_List)


End Sub


'Main:


Create_Window_Main ()

Fl_WidgetSetCallback0 (Choice_List, @Choice_List_Event())

Fl_WindowShow (Window_Main)

Fl_Run


End
The associated screenshot:
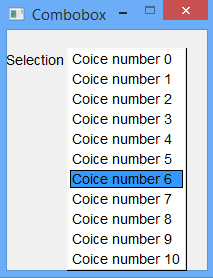
The code is similar to the example of the listbox. However, since the widget
Fl_Choice is a subclass of F-Menu_, the addition of data does not
happen with "Fl_ChoiceAdd", but with Fl_Menu_Add. With
Fl_ChoiceSetValue the index of the first entry to be displayed in the
combobox is defined.
4.7 Fl_Menu_Bar, flFileChooser, flMessageBox
With Fl_Menu_Bar we can create a standard menu bar interface. Example:
#Include "fltk-c.bi"


'Declaration of the callback functions - see below:

Declare Sub NewFile Cdecl (widget As Fl_Widget Ptr, userData As Any Ptr)

Declare Sub OpenFile Cdecl (widget As Fl_Widget Ptr, userData As Any Ptr)

Declare Sub SaveFile Cdecl (widget As Fl_Widget Ptr, userData As Any Ptr)

Declare Sub EndProgram Cdecl (widget As Fl_Widget Ptr, userData As Any Ptr)

Declare Sub Info Cdecl (widget As Fl_Widget Ptr, userData As Any Ptr)


Dim Shared As Fl_Window Ptr Window_Main

Dim Shared As Fl_Menu_Bar Ptr Menu


Sub CreateWindow_Main ()

'Window with menu


    Window_Main = Fl_WindowNew (300, 200, "Test menu")

    Menu = Fl_Menu_BarNew (0, 0, 300, 20)

    Fl_Menu_Add (Menu, "File/New" ,,@NewFile())

    Fl_Menu_Add (Menu, "File/Open" ,, @OpenFile())

    Fl_Menu_Add (Menu, "File/Save" ,, @SaveFile())

    Fl_Menu_Add (Menu, "File/End" ,, @EndProgram())

    Fl_Menu_Add (Menu, "Help/Info" ,, @Info())


End Sub


'Callback functions:


Sub NewFile Cdecl (widget As Fl_Widget Ptr, userData As Any Ptr)

    Print "New File"

End Sub


Sub OpenFile Cdecl (widget As Fl_Widget Ptr, userData As Any Ptr)

    'Select a file to open:

    Dim As Zstring Ptr file

    file = flFileChooser ("Open file", "*.bas" + Chr(9) + "*.txt", ExePath(), 1)

    If file <> 0 Then Print "Selected file:" + *file

End Sub


Sub SaveFile Cdecl (widget As Fl_Widget Ptr, userData As Any Ptr)

    Print "Save File"

End Sub


Sub EndProgram Cdecl (widget As Fl_Widget Ptr, userData As Any Ptr)

    End

End Sub


Sub Info Cdecl (widget As Fl_Widget Ptr, userData As Any Ptr)

    'Show Info:

    flMessageBox ("Program Information", "Menu test program")

End Sub


'Main:


CreateWindow_Main ()

Fl_WindowShow (Window_Main)

Fl_Run


End
Here is the screenshot:
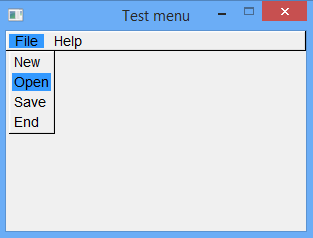
The menu entries are created in a very simple manner with Fl_Menu_Add. The
third parameter can be a shortcut key for the menu item in question (optional),
e.g. FL_CTRL + Asc("e") for "End". The fourth parameter links the menu item
with the corresponding callback function. The callback function must contain a
pointer to user data as the second parameter, in contrast to the previous examples,
because with Fl_Menu_Add a link to a Sub of type Fl_Callback is produced instead to a Sub of type Fl_Callback0 (as before).
In the callback functions in this example, we also come to know two standard dialogs:
flFileChooser and flMessageBox.
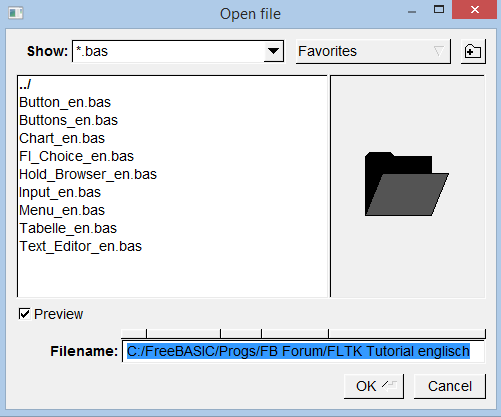
The flFileChooser is a file selection dialog. The syntax is nearly
self-explanatory, except for the last parameter. This has the following meaning:
1 = relative path
0 = absolute path
The flMessageBox is a simple messagebox with only a "Close" button.
Here are the screenshots:
flFileChooser:
flMessagebox:

4.8 Other Standard Dialogs (Common Dialogs)
(No screenshots)
If you need a messagebox where the user can make a decision (e.g. "Yes", "No",
"Cancel") (up to three buttons), you use flChoice.
An example of using flChoice:
Dim result As Integer


result = flChoice ("Do you really want to exit?", "Yes", "No", "Maybe")


Select Case result

    Case 0

        End

    Case 1

        '.....

    Case 2

        flMessageBox ("What's that?", "You need to decide!")

End Select
Other standard dialogs are flColorChooser and flInput.
The flColorChooser allows a choice of colors with different settings. If
colors shall be selectable and returned as RGB values, this is the syntax:
Dim As UBYTE r, g, b

flColorChooser ("Select a color", r, g, b, FL_COLORCHOOSER_BYTE)

Print "Selected color (r, g, b): ", r, g, b
The values r, g and b can be set as a preselection in the range 0 to 255.
FL_COLORCHOOSER_BYTE indicates that these values can be displayed and edited in
the colorchooser as byte values (0 to 255). Using other flags, it is also possible
to select values (r, g, b) in the relative range from 0 to 1 or in hexadecimal format.
flInput is a window with an input textbox, eg:
Dim s As String

s = *flInput ("Enter your name:", "Henry Miller")

Print s
(In this example "Henry Miller" can be edited.)
| Zusätzliche Informationen und Funktionen | |||||||
|---|---|---|---|---|---|---|---|
|
|
||||||


 FreeBASIC-Nachrichten jetzt auch über Twitter erhalten. Follow us!
 Bearbeiten
 Versionen